Stage 02.2 Cont’d – Next Areas of Work & Transition Application

Cardnell’s words well illustrate the process through which he endures on every canvas – his road map, so to speak. Where he starts and where he finishes can be as much a discovery process to him as to any. Keith starts with an idea in his head, a vision in his mind of how the painting will evolve. But the painting often reveals itself to him as he gets into the process and will lead him to places he may not have originally considered…
Cardnell:
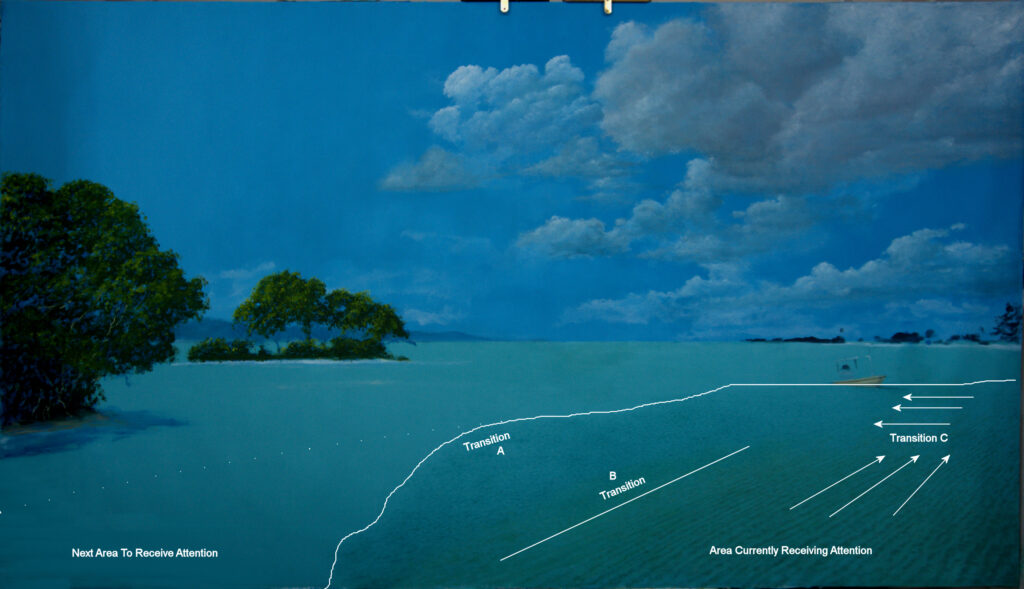
Transition C: This is where refracted light from a visible seabed transitions to reflected light from the surface of the sea. The ridges of the seabed run about 30 degrees off the vertical, whereas the surface of the sea appears to be affected by a breeze from the right which is pulling horizontal bands of blue across the underlying turquoise blue/green.
Transition B: This is where the ridges in turquoise blue/green start to disappear and the seabed pattern transitions into irregular patches of a darker blue.
Transition A: This is where most of the irregularity of the seabed dissipates and transitions into a distribution of barely differentiated soft mounds of sand. It’s important to get this right as, on the left, in the ‘Next Area To Receive Attention’ I intend to put my shoal of Bonefish. The distortion due to the water refraction of light from the Bonefish (and the fish shadows) that I want to introduce would be less obvious, and distracted from, if this area of seabed was as disturbed as the ‘Area Currently Receiving Attention’.
Virtually all of the sea area above the ‘Area Currently Receiving Attention’ and the ‘Next Area To Receive Attention’ will be detailed with short, horizontal highlighted brushstrokes within, near horizontal, colour/tone differentiated, banding.
Building tide ridges is quite exacting and turning into a bit of a slog. My original intention was to cover the base turquoise layer with a darker layer and, while still wet, pull out the ridges with rag. This didn’t work because the rag didn’t remove enough of the darker layer as a large amount of paint imbedded itself in the ‘tooth’ of the underlayer. Also, I found it impossible, with this method, to vary the width in removing paint for the ridges, from the upper layer, which would have imparted a strong sense of perspective in the composition.
Whilst this is proving to look more authentic, it is taking time as I have to tone down each initial paint application to ensure it appears to represent a softly undulating sea bed defused and distorted by a shallow layer of water. Onto this I will add my debris and Bonefish before applying the sharp white highlights of ‘lensed’ sunlight. Stage 02.3 Final will be completed before the debris, Bonefish and highlights are added. I think it important and worth the effort to suggest a ‘logic’ to the sea bed rather than random shapes. This is because it’s a very large area and the ‘action’ is going on elsewhere in the painting. It’s not intended to be a focal point but these ridges certainly enhance the illusion of depth and, together with the clouds, should drag the eye in and hold it. So, this is taking a lot more effort than I initially expected but (as builders say) the quality of the finish is dictated by the preparation. I’m aiming for ‘museum quality’ and this, at the very least, is what it takes.
